|
How
to Use A Compass
How to use a compass is a
question many walkers seem afraid of addressing. This section sets our the
basics in simple terms. Some think it is complicated. It isn't but like
many things in life, practice increases confidence.
The number of call outs to
Mountain Rescue Teams is increasing because too many people are relying too
heavily on mobile phones for navigation and heading to quite
difficult/dangerous terrain with no map or compass. Please spend a little
time working through the guidance below.
It is important
to be able to use a compass. It could save you from taking completely the
wrong route which in itself can be dangerous or the walk could end up being
considerably longer than anticipated, perhaps beyond the endurance of you or
some of your party. Most walkers start from a parked car and you need to be
able to get back to it.
Of course, on a
bright sunny day, with a clear path and good visibility with clear visual
reference points, you may not need to use a compass. But, what if you are on
a featureless hillside or moorland with an indistinct path and/or mist or
cloud suddenly descend.
Just as you are
right or left handed, you are also right or left legged, i.e. you have a
dominant leg. In thick mist with no visual reference points, you will walk a
circle - a bit like a rowing boat with one oar. You cannot consciously
change this. I have done it myself when I was too lazy to get out
the compass and over confident that I knew the way. These are the sorts of occasions when the compass comes into
its own.
It is not necessary to spend a
fortune on an effective compass. You can get one for under £20. The best
known range is probably Silva.
To be most effective
in its use, you need to know, at least approximately, where you are. Therefore, use it
sooner rather than later.
To state the obvious, the red
section of a compass needle points north. In relation to North, at 12
o'clock, East is at 3 o'clock, South at 6 o'clock and West at 7 o'clock. If
you never use a compass to any great extent than that, it provides a quick
reference at any point, as to whether you are going in roughly the direction
you should.
Navigation becomes more accurate
when you relate it's readings to an OS map, To make the excruciatingly
obvious point, the top of a map is north, bottom south, left west and right
east. No doubt you knew that (sorry) ........... but just in case.
On OS maps, you
will see the diagram on the right.
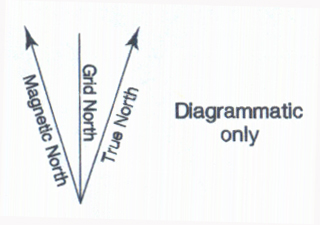
Accompanying
it will be a statement such as:
"At the
centre of this sheet true north is 0º 59' east of grid north. Magnetic
north is is estimated at 2º 09' west of grid north for July 2007. Annual
change is approximately 09' east.
Magnetic data
supplied by the British Geographical Survey."
Already the
cries of "gadzooks" or worse no doubt! In
fact, we can instantly reduce the complexity by a third. True north is of no
use to us at all. We only care about the grid north (which not surprisingly
relates to the grid on the map) and magnetic north (where the compass
points). Forget
about true north. We will not mention it again. We
will look at the crucial parts of the rest of the statement shortly but first let's
look at a simple compass (simple but quite adequate)
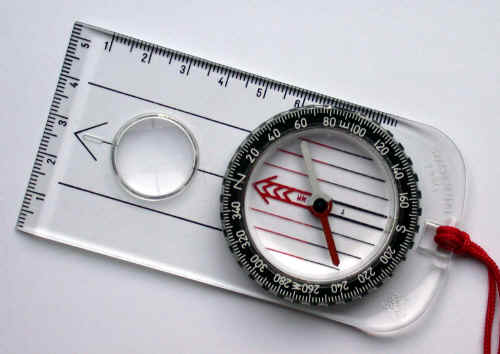
We
have a clear plastic base. Along two sides are small rulers to help measuring
distances. The clear round "hole" is a magnifying glass (some map
print is quite small after all). The black arrow next to the magnifying
glass will indicate the direction of travel. In
this case, the
black ring (or bezel) is marked at 2º (i.e. 2 degree) intervals, 360º
being the complete circle. However, check the intervals on any compass you
buy. Note under the "N" is a small fixed white line,
difficult to see on the picture. Just bear this in mind for now. The
bezel is attached to the compass base, the part
with the red arrow and the 6 adjacent parallel lines. The bezel turns on the
baseplate. The red and white needle is the magnetic compass itself and the
red part always points north. Returning
to the statement, which we will examine in two parts. "Magnetic
north is is estimated at 2º 09' west of grid north for July 2007." Degrees
are divided into "minutes", 60 of them in each degree. In this
case magnetic north is 2 degrees 9 minutes west of grid north in July 2007.
You cannot meaningfully measure to minutes on a simple hand compass so
simply round anything under 30' down and over 30 up, to the next degree. "Annual
change is approximately 09' east." Although
a magnetic compass always points to magnetic north, unfortunately, magnetic north moves,
albeit only minutely. The OS note tells you by how much.
However, an annual change of this level is tiny and it will be a year or two
before we need to round up to 3º . Our adjustment is therefore 2º.
We will come back to this in a minute. Here
is a facsimile of a map which is kept rudimentary so that the grid lines
stand out. Assume
you want to get from point A to point B where perhaps there is a footpath but it is
indistinct and point B is somewhere in the mist.
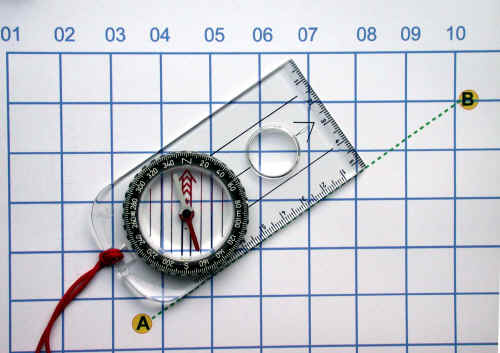
Simply
lay the compass on the map with its edge along the route you wish to travel,
with the large black arrow in the direction you want to go.
Twist the bezel so that the lines within on
the base are aligned with the grid lines on the map with the "N"
of the bezel to the top of the map. As you can see, the needle itself is
pointing roughly to the bottom. Don't worry about that. At this stage, it
can be pointing anywhere. The
next step is to adjust for the extent to which magnetic north is not aligned
with grid north. If we take a close up view of the
bezel, you
can see that just to the left of the 60º mark a small but longer fixed
white line on the baseplate below the bezel we mentioned earlier.
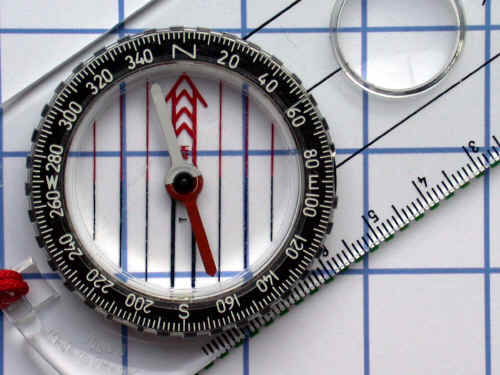
The small white markings between the 60 and
40 each represent 2º. As magnetic north is 2º west of grid north, we
adjust by rotating the bezel one small mark anti-clockwise using the fixed
black line on the base as
a guide. Relative to grid north, the "N" mark on the bezel and the
red arrow (not the needle) are now
in the direction of magnetic north, relative to the map.
Now
remove the compass from the map, hold it horizontally and allow the needle to point itself to magnetic north and
slowly turn the compass until the red of the needle is inside the red arrow on the
base. Now
simply follow the direction arrow below, keeping the needle inside the guide
on the baseplate.. 
With
a very small deviation of magnetic north from grid north (i.e. only 2º) it
is arguable whether it is worth making the adjustment. E.g. just align with
the grid lines. Over short distances, this would no doubt be fine. It is
only over longer distances that the error would become significant. And,
it doesn't hurt to be accurate in any case! Remember
the dominant leg? Well in poor visibility, even following the arrow you
could still veer off. It is best to aim the arrow at something, even a
tussock of grass or a specific rock some distance away, walk to that, then
"take aim" at something else. In this way, your route should
remain straight. In the absence of any suitable objects, you could guide a
companion to a suitable position, walk to him then repeat. In
theory, if you are lost, you can determine your position by reversing the
above process namely, point the direction arrow at a known landmark, turn
the bezel until the red of the compass needle is within the red arrow then
put the compass on the map with the red arrow aligned north with the grid
lines and the side of the straight side of the base against the same
landmark on the map. If you do this with a second landmark, where the lines
cross will be your position. More accurate is to take three readings. You
should be in the centre of the triangle. Once again to be accurate, you could adjust for
the magnetic deviation. The
difficult part can be determining a landmark with certainty and it could be
impossible in reduced visibility. A mountain you
think you know can look different from a different direction. Is the church
spire in village A or village B? By far the best option is not to get so
lost in the first place, by regular reference to the map and of course by
not relying solely on a route from a book.
It
may help to orientate yourself if you “set the map”. This term refers to
positioning the compass on the map so that its north marking is aligned with
north on the map, as follows.
Turn
the bezel on the compass so zero degrees or ‘N’ is aligned with the
direction arrow on the base plate.
Holding
the map flat, align the edge of the rectangular compass plate with the
north/south grid lines so that the direction arrow points north.
Keeping
the compass in the same position on the map, turn them both so that the red
needle lines up with the north/south indicator on the compass. The map will
then be oriented with reality and you should be able to recognise the
features in front of you.
A
term you might come across relating to navigating with a compass is
"aiming off". Let's assume that point B on the map below is the
corner of two walls, indicated by a black line (as indeed it would be on a
1:25000 scale OS map) and that the corner is crucial to following your
route. If visibility was poor and you erred slightly following the compass,
you could end up too far north, miss the corner and finish up who knows
where. In this case, it would be better to aim further along the wall
indicated by the blue dotted line, to be certain of hitting it, then turn
left to follow it to the corner.
.jpg)
One
tip, it is worth working out compass bearings from strategic points on a
walk (e.g. from a trig. point) before a walk and writing them on a
piece of paper to slip into your map case. It is much easier and with less
chance of error to do this in
the comfort of your home/car than in a howling gale with the rain beating
down on a mountain top! Finally,
trust your compass. If it is not directing you in the direction you expect,
it is not likely to be the compass that is wrong! However, it needs to be
kept away from metal objects when you are using it and avoid putting it near
anything magnetic, which can (exceptionally) reverse the polarity. It this context, beware
any magnetic fastenings on clothing or bags. If there are two of you, it is
always worth checking your companions compass too. You have more chance of
winning the lottery than two compasses being wrong! If
you are flush with cash, a GPS receiver can not only tell you exactly where
you are but also do the entire navigation for you. Do bear in mind that they
need a clear view of the sky so can be ineffective under heavy tree cover.
Using
Map and Compass Reading List
Visit the Happy Hiker
Hiking
Store to buy compasses.
All information on this
site is given in good faith and no liability is accepted in respect of any
damage, loss or injury which might result from acting on it.
|


.jpg)
.jpg)
.jpg)